|
|
|
|
Energy Checking Module: |
| |
|
1. Gaining an Initial Feel for Energy Checking |
Review |
|
2. Preparing to Do an Energy Check
|
Review |
|
3. Doing an Energy Check
|
Review |
|
|
|
Neurological Disorganization Module: |
| |
|
Identifying and Treating Neurological Disorganization |
Review |
|
|
|
Psychological Reversals Module: |
| |
|
1. Checking for Psychological
Reversals
|
Review |
|
2. Resolving Psychological Reversals
|
Review |
|
|
|
|
Opening Phases of Treatment Module: |
| |
|
Opening Phases Practice Session |
Review |
|
|
|
Meridian Treatment Basics: |
| |
|
Balancing the Meridians |
Review |
|
|
|
Formulating Energy Interventions Module: |
| |
|
1. Opening Phases of Treatment
|
Review |
|
2. The Treatment Point Sequence
|
Review |
|
3. Bridging Techniques
|
Review |
|
4. The Treatment Point Sequence (again)
|
Review |
|
5. Subsequent Rounds
|
Review |
|
|
|
Advanced Meridian Treatments Module: |
| |
|
|
|
|
Closing Phases Module: |
| |
|
1. Anchoring Techniques
|
Review |
|
2. Outcome Projection Procedure
|
Review |
|
3. Back-home Assignments
|
Review |
|
|
|
Transforming Core Beliefs Module: |
| |
| Core
Belief Practice Session |
Review |
|
|
|
Protocols and Shortcuts Module: |
| |
|
1. Using a Problem-Specific Protocol
|
Review |
|
2. Enhancing Peak Performance
|
Review |
|
|
|
Working with the Chakras Module: |
| |
|
|
|
|
The Radiant Energy System Module: |
| |
|
1. Four Familiar Radiant Energy Techniques
|
Review |
|
2. Six New Radiant Energy Techniques
|
Review |
|
3. Balancing the Radiant Circuits
|
Review |
|
| |
|
|
| |
 If you have
satisfactorily completed the practice sessions, please close
this window.
If you have
satisfactorily completed the practice sessions, please close
this window. |
| |
| |
|
|
|
|
PRACTICE SESSION 1: GAINING AN INITIAL FEEL FOR ENERGY
CHECKING |
|
|
|
|
The reason to practice at this point is simply so you
have an initial feel for performing an energy check as you learn more
about the procedure. While in most of the practice sessions it is
recommended that you do the session with a colleague, since
psychological issues can arise that might put you into an unintended
therapist role with a friend or family member, this is not a concern for
the three practice sessions in this module. After you have chosen a
practice partner: |
| |
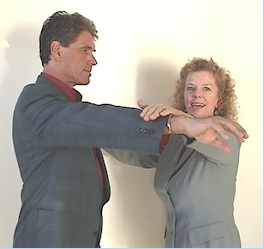
-
Select one of the three energy checks to begin:
|
a) arm parallel to the ground and out to the side
|
 |
|
b) arm straight down side of body
|
|
|
c) thumb and little
finger or index finger forming a circle
|
|
Review
the 3 energy checks
- Make sure there is no contraindication for using the arm, such as
an injury or sprain.
|
-
Gradually apply pressure for 1˝ to 2
seconds to see if there is a "bounce."
-
If the muscle does not stay firm, have
the person tap with all five fingers the center of his or
her chest several times. This will usually make the muscle
firm. If it does not, lead the person through the
3 Thumps/3 Navel Touch. If after this the person’s
muscle still does not become firm, use one of the other
two energy checks.
|
|
|
|
|
|
|
|
|
-
Once you have a firm indicator muscle,
have the person say, "I am wearing [something actually
being worn]." Energy check. The muscle should stay firm.
Then have the person say, "I am wearing [something not
being worn]." Energy check. This should give you a
differential between the muscle staying firm and losing
its firmness. If it does not, return to this practice
session after you have corrected for neurological
disorganization in the next module.
-
Reverse roles with your partner.
-
Repeat, using the other two energy checks.
|
|
|
Return to List of Energy
Checking Practice Sessions |
|
|
|
|
PRACTICE SESSION 2: PREPARING TO DO AN ENERGY CHECK |
|
| |
Imagine you are
about to introduce energy checking to a new client (or have someone
role-play the part):
-
What are five physical considerations you will
attend to?
Review
-
What will you do with your eyes during the energy
check?
Review
-
What signals will you use and ask the client to
use during the energy check?
Review
-
What attitudes will you keep in your awareness?
Review
-
Vividly imagine a specific, unique client. Out
loud, role-play what you will say to this person to introduce energy
checking.
Review
Return
to List of Energy Checking Practice Sessions
|
|
|
|
|
PRACTICE SESSION 3: DOING
AN ENERGY CHECK |
|
| |
|
Now put it all together. With a colleague
role-playing the client, go through the preparation phase (physical
considerations, signals, eye position, internal attitudes, words you use
to introduce the client to the energy checking (or
Review) and qualify
an indicator muscle (or
Review).
Return to List of
Energy Checking Practice Sessions
|
|
|
|
|
NEUROLOGICAL DISORGANIZATION PRACTICE SESSION
|
|
| |
-
Check a colleague for each of the sources of
neurological disorganization described in the chart. With a little
practice, you will be able to do all five checks within a minute.
Apply the appropriate treatment sequence to each type of
neurological disorganization you identify.
-
Trade roles. You become the "client" and guide
the person in energy checking you and applying the treatments.
-
With the other person neurologically balanced,
shift into a role-play in which the energy check "reveals" one of
the types of neurological disorganization not already worked with.
Apply the treatment for that type. Proceed until you have had
practice with each type of neurological disorganization. Even if not
needed, these procedures will do no harm and are will reinforce the
healthy flow of energies.
Return to List
|
|
|
|
|
PRACTICE SESSION 1: CHECKING FOR PSYCHOLOGICAL REVERSALS

|
|
| |
-
Qualify an indicator muscle on a colleague with
whom you can delve into psychological issues. Energy check the global
statement, "I want to be happy." Then proceed through the various
possible qualifying criteria: "It is safe for me to be happy," "I
deserve to be happy," etc. If you find any global or
criteria-related global PRs (based on an energy check of an indicator
muscle done immediately after completing the statement), remember it or
write it down to be used in the practice session on correcting for
psychological reversals.
Review
basics about global and criteria-related psychological
reversals.
-
Ask the person to describe a habit, an emotional response, a
behavioral pattern, or a way of thinking he or she would like to change.
Energy check a statement in the form of "I want to [change this
pattern]." Proceed through the various possible qualifying criteria:
"It is safe for me to . . . ," "I deserve to . . . ," etc.
If you find a specific-context or a
criteria-related
specific-context PR (based on an energy check), remember it for the
practice session on correcting for psychological reversals.
Review
basics about specific-context psychological reversals.
- Reverse roles. You become the "client" and guide your partner in
checking for psychological reversals.
Return to List of
Psychological Reversal Practice Sessions
|
|
|
|
|
PRACTICE SESSION 2: RESOLVING PSYCHOLOGICAL REVERSALS
|
|
| |
|
Begin with the psychological reversals you and your
partner identified during Practice Session 1. Formulate the affirmations
and experiment with the above energy interventions for resolving each of
your partner’s PRs. Then instruct your partner on how to carry out the
procedure for you. Enlist several other people to check for
psychological reversals and correct any you identify.
Return to List of
Psychological Reversal Practice Sessions
|
|
|
|
|
PRACTICE SESSION: OPENING PHASES OF TREATMENT |
|
| |
|
With a colleague role-playing a client coming in with
a specific problem or using an actual problem, go through each of the
phases of the early part of treatment. The target problem could be a
fear, phobia, anxiety, anger, lack of confidence, grief, worry,
jealousy, guilt, shame, obsession, or any other undesired emotional
response to a specific situation, thought, image, or memory. Please take
care that the problems you target are appropriate given the context of
your practice sessions. The treatment tasks to cover in this practice
session are to:
Build rapport.Gather information about the client’s background and treatment
goals.
Explain and obtain informed consent about using an energy-based
approach.Establish a familiarity and some success with energy checking.
Check for and correct neurological disorganization.
Check for and resolve global psychological reversals.
Formulate an appropriate target problem.
Check for and resolve specific-context psychological reversals
involved with the problem.
Access the problem, rate it, and "lock it" in.
You are now ready to begin the energy intervention phase that
begins with the next module.
After this sequence, solicit feedback. Reverse roles.
Return to List of
Practice Session
|
|
|
|
|
PRACTICE SESSION: BALANCING THE MERIDIANS |
|
| |
|
Balance your own meridians by tapping the 12 points
on the One-Point-per-Meridian Chart (for each
point, tap during an inhalation and exhalation, pause during an
inhalation and exhalation, tap again) and then hooking up the
central and governing meridians.
Instruct a partner in balancing his or her meridians.
Return to List of
Practice Sessions
|
|
|
|
|
PRACTICE SESSION 1: OPENING PHASES OF TREATMENT |
|
| |
|
NOTE: The instructions for the practice session in
the "Opening Phases" module are repeated below. If you have already done
this with a partner, your partner is still available to continue working
with you, and the work you did is still fresh, skip this practice
session and jump to the subsequent
practice session.
You and your partner will, within this module, each do an entire session
as therapist and an entire session as client.
With a colleague role-playing a client coming in with
a specific problem (or using an actual problem), go through each of the
phases of the early part of treatment. The target problem could be a
fear, phobia, anxiety, anger, reactiveness, lack of confidence, grief,
worry, jealousy, guilt, shame, obsessiveness, or any other undesired
emotional response to a specific situation, thought, image, or memory.
Please take a measure of the intensity of the problem and its
appropriateness for these practice sessions. The treatment tasks to
cover in this practice session include:
 Jump to the "Opening
Phases" module to review these preliminaries.
Jump to the "Opening
Phases" module to review these preliminaries.
After this sequence, solicit feedback. Switch roles.
Return to List
of Practice Sessions for Formulating Energy Interventions
|
|
|
|
|
PRACTICE SESSION 2: THE TREATMENT POINT SEQUENCE |
|
You have some choices here.
Beginning with the simplest:
-
Tap each of the 8 treatment points from the "Basic
Basics" module between five and nine times.
Review
this tapping sequence.
Or
Use a treatment point sequence you have learned
elsewhere (TFT, the full set of EFT points, TEST, BSFF, etc.).
Or
Stimulate each of the 14 points from the
"Meridian Treatment Basics" module by tapping the first 12 points
between five and nine times each and then hooking up central and
governing.
Review
this treatment sequence.
Or
-
Same as numbers 1, 2, or 3, but tap each of the
points for the length of an inhalation and exhalation, stop for the
length of an inhalation and exhalation, and tap again.
Research is not available about which sequence is likely to be most
effective. It would seem, however, that using all 14 points would be
more potent for balancing the associated meridians and that the longer
tapping sequence would be more effective in more situations.
On the other hand, this might be more intervention than is necessary,
and a tremendous amount of anecdotal evidence suggests that simpler
sequences are effective a good deal of the time. In one sense, it does
not matter which set of points you use: If the sequence is not effective
in bringing down the client’s distress level (SUD) while the problem
state is activated, you would then move to the sequence taught in the
Advanced Meridian Treatments module (following).
Plausibly, if you adopt the combination of number 3 and number 4
above, you will need to move to the advanced methods less frequently
than if you adopt number1. In that sense, starting with the more complex
sequence might ultimately lead to a less complex treatment. But it is
truly dealer’s choice.
Select a treatment sequence that you will use for the remainder of
this module and, with the problem state locked in, show your "client"
how to stimulate the points. As soon as the SUD decreases, even
slightly, it is often reassuring for clients to hear that they are
responsive to this method. Even if the SUD moves down slowly, the fact
that it is moving at all means the indications are good for obtaining
the desired results by applying the technique persistently while
remaining alert for any neurological disorganization, psychological
reversals, or unresolved aspects of the problem. A small proportion of
people, however, apparently do not respond to meridian tapping, and in
these cases, other techniques may be employed, such as the
Touch and Breathe
method of meridian stimulation or working with other energy systems,
such as the
chakras
or the
radiant circuits.
It is better now to go through the remainder of the treatment
sequence with one of you in the therapist role and the other in the
client role. Switch roles at the end of the treatment session.
Return to List
of Formulating Energy Interventions Practice Sessions
|
|
|
|
|
PRACTICE SESSION 3: BRIDGING TECHNIQUES |
|
| |
|
The 9 Gamut procedure, which you learned in the
Basic Basics module, has become a standard within energy psychology.
Other techniques, loosely called bridging techniques because they
are performed between procedures that specifically focus on the
designated problem, can also be used as the middle of the
"treatment sandwich." These techniques enhance the effects of the
interventions they bridge. Four bridging techniques are listed and
described below. On subsequent rounds through the treatment, experiment
with any of these—they are easy to do and require only a minute or two
each. The techniques include the 9 Gamut Procedure, the
Blow-out/Zip-up/Hook-in, the Elaborated Cross-crawl, and Connecting
Heaven and Earth. Experiment with each of them. |
| |
|
|
| |
|
You can use any one of these bridging techniques
between rounds of tapping. Most practitioners find a favorite and use it
most of the time, introducing others as intuition dictates.
Choose one, review it, practice it, and show your "client" how to do
it.
Return to List
of Formulating Energy Interventions Practice Sessions
|
|
The 9 Gamut Treatment |
|
|
| |
|
While steadily
tapping the gamut spot
(the point on the back of the left hand that is
just below the knuckles and between the ring finger and the little
finger),
have the client do each of the
following: |
| |
|
1. Close
eyes. |
|
2. Open eyes. |
|
3. Move eyes
to lower left. |
|
4. Move eyes
to lower right. |
|
5. Rotate
eyes clockwise 360 degrees
|
6. Rotate eyes counter-clockwise 360
degrees
|
7. Hum a tune
for a few seconds (e.g.,
"Happy Birthday," "Row, Row
Your Boat,"
"Zipadee Doo Dah"). |
|
8. Count to
five. |
|
9. Hum again. |
|
|
|
|
| |
|
Variations:
-
Instead of the fifth and sixth steps, move the eyes in a
horizontal figure-8 (the therapist might draw an infinity sign in
the air), first in one direction, then the other.
-
End by bringing the eyes down to the floor and then slowly bringing
them up to the ceiling, projecting sight out into the distance as the
eyes move up the arc.
Return to list of Bridging
Techniques |
|
Blow-Out Zip-Up
Hook-In |
|
|
| |
| |
Blow Out: Make fists and put arms in front of you with your
fists facing up. Take a deep inhalation and swing your arms above your
head. With the fists facing toward you, bring your arms down swiftly to
the sides, opening your hands, exhaling and releasing the energy charge.
Repeat several times.
|
|
| |
Zip Up: Place hands at groin and drag them slowly straight
up the front of the body on an inhalation, leaving the body at the lower
lip and continuing up and over your head. Repeat 3 times.
|
|
| |
Hook In: Place middle finger of one hand at third eye and
of the other hand at navel. Press in and pull up. Hold for 15 to 20
seconds.
|
|
Return to list of Bridging
Techniques
|
|
Elaborated
Cross-Crawl |
|
|
| |
|
A bridging technique that
is also a good preliminary before the elaborated cross crawl is to
briskly tap the shoulders and neck while breathing deeply. Alternate the
tapping between the left and right sides. Then: |
| |
| |
-
March in place, touching the right
hand to the left knee and the left hand to the right knee.
|
|
| |
-
Continuing the cross-crawl,
hum-count-hum, for about 5 seconds each.
|
|
| |
-
When completed, circle the eyes in each direction or
make figure eight patterns with the eyes.
|
|
Return to list of Bridging
Techniques
|
|
Connecting Heaven
and Earth |
|
|
| |
|
You learned this technique as part of the
3-Part/3-Minute generic correction for neurological disorganization. It
is also an excellent bridging technique.
To review: stretching is one of
the most natural ways to keep the body’s energies moving, which is in
turn one of the best ways to keep the mind clear. From watching cats and
dogs upon waking to practicing disciplines that have made stretch into a
science, such as yoga, many models are available. Versions of the
following exercise have been found in numerous cultures, and it is not
only an excellent way to get energy flowing throughout the body, it is
formulated to help integrate the left and right brain hemispheres and
activate the energy system know as the
radiant circuits. Here are the instructions you would use to guide a
client in "Connecting Heaven and Earth." |
| |
-
Rub your hands together and
shake them out.
-
Stand with your hands on your
thighs and fingers spread.
-
With a deep inhalation, circle
your arms out.
-
On the exhalation, bring your
hands together in a prayerful position.
-
Again with a deep inhalation,
separate your arms from one another, stretching one high
above your head and flattening your hand back, as if
pushing something above you.
|
|
|
-
Stretch the other arm down, again flattening your hand
as if pushing something toward the earth. Stay in this
position for as long as is comfortable.
-
Release your breath through your mouth, returning your
hands to the prayerful position.
-
Repeat, switching the arm that raises and the arm that
lowers. Do one or more additional lifts on each side.
-
Coming out of this pose the final time, bring your
arms down and allow your body to fold over at the waist.
Hang there with your knees slightly bent as you take two
deep breaths. Slowly return to a standing position with a
backward roll of the shoulders.
|
|
Return
to list of Bridging Techniques |
|
|
|
|
|
|
PRACTICE SESSION 4: The
Treatment Point Sequence (again) |
|
| |
|
The Last Part of the Sandwich |
| |
|
Repeat the treatment point sequence exactly as you
did in the first part of the sandwich.
When you have completed the sandwich
(treatment point sequence, bridging procedure,
treatment point sequence), again assess the intensity of the
problem. Clients may be able to focus more easily on the problem if they
close their eyes. Have them tune into the problem, bring the original
problem or memory to mind, and give it a rating from 0 to 10 on the
amount of distress it causes them now, as they think about it.
If no trace of the previous emotional intensity
remains, then you are done with the sandwich and ready to move on to
anchor the gains. If, on the other hand, the SUD goes down, lets
say, to a 4, perform subsequent rounds until 0 is reached or until you
can reduce the number no further.
Return to List
of Formulating Energy Interventions Practice Sessions
|
|
|
|
|
PRACTICE SESSION 5: SUBSEQUENT ROUNDS |
|
| |
|
Sometimes a problem will be resolved after a single
round of treatment. More often, only partial relief is obtained and
additional rounds are necessary.
Between rounds, discuss anything about the treatment
that concerns the client or does not seem to be going as planned. Three
additional areas should also routinely be considered between each round: |
| |
|
|
| |
|
Before returning to the next round of treatment, also
be sure the problem is still "locked in" (indicator muscle goes weak
during an "in the clear" energy check), particularly following periods
of dialogue or intense emotion.
Return to List
of Formulating Energy Interventions Practice Sessions
|
|
|
|
Considerations about Neurological
Disorganization between rounds of acupoint
stimulation: |
| |
|
Simply accessing the problem may introduce subtle
disruptions within the client’s neurological system. The bridging
procedures done within each round tend to counteract this tendency, but
they are not always enough. While it is not necessary to frequently test
for neurological disorganization, stay alert for signs of confusion,
jumbled words, or loss of mental acuity.
If these appear, consider introducing the
3-part/3-minute correction for neurological disorganization
(Crown Pull, Connecting Heaven and Earth, Wayne
Cook Posture). This will usually correct the problem for the
purposes of treatment. If it does not, do the five tests described in
the
Neurological Disorganization module (all five require only one
minute) and use the correction techniques shown there as appropriate.
Any of the procedures in the
5 Minute Energy Routine can also be introduced between rounds of
treatment, as well as other exercises for keeping the energy system
clear and flowing.
Return to
"Subsequent Rounds" Practice Session
|
|
|
|
Considerations about
PSYCHOLOGICAL REVERSALS between
rounds of acupoint stimulation. |
| |
|
Psychological reversals may emerge at any point
during the treatment, and when they do, they can inhibit further
progress. Psychological reversals that emerge during treatment
are called intervening psychological reversals
The check for an intervening psychological reversal
might be worded something like, "I want to be completely over
this problem" [or describe problem]. "Completely" is the element that
distinguishes an intervening psychological reversal. Like other PRs,
intervening PRs might also be organized around specific criteria. The
wording to check for a criteria-related intervening PR, might be "I
deserve to be completely over this problem" [or: "It is safe to .
. ."; "It is safe for others if I . . ."; "It is possible for me to . .
.", etc.].
Jump
to the Psychological
Reversals module for more details on such
wordings and to review how to correct for a psychological reversal.
Return to
"Subsequent Rounds" Practice Session
|
|
|
|
Considerations about
SUD Ratings
between rounds
of acupoint stimulation: |
| |
Brief Review: The SUD rating is a subjective verbal
estimate, on a scale from 0 to 10. It can be corroborated with an energy
check (e.g., client says "It’s a 3," followed
by checking an indicator muscle). The energy check to
corroborate a SUD rating is called a MUD (muscular units of distress)
rating.
Periodic assessments of the distress still experienced in association
with the problem (SUD and MUD) should be taken regularly. They provide a
gauge on the effects of the acupoint treatments. Each assessment also
leads to a choice point. Since you are in the middle of a practice
session, simply click the “Next Step” instructions for what you need to
know for the purposes of the practice session. You can return later to
study the options for each of the five possible conditions.
IF THE SUD HAS:
|
| |
|
|
| |
|
Return to
"Subsequent Rounds" Practice Session |
|
|
| Decreased by at least 2
units but is still above 2: |
| |
- Do another round of the acupoint stimulation "sandwich"
Return to
SUD Possibilities
|
|
|
| Stopped Decreasing and is
still above 2: |
| |
-
Check for any intermittent psychological
reversals (e.g., "I want to be completely over this problem")
and their variants based on specific criteria (e.g., "It is safe to
be completely . . .," etc.).
-
Resolve any that are found and return to the next
round of the sandwich.
-
If there were no PRs, check for neurological
disorganization, correct if detected, and return to the next round
of the sandwich.
Click
here for List Summarizing Psychological Reversal and
Neurological
Disorganization
Checks and Treatments.
Return to
SUD Possibilities
|
|
|
|
Stopped Decreasing, is still above 2, and No
PRs or ND are present: |
| |
-
Explore whether another
aspect of the problem requires attention before further
progress can be made, and if so, shift the focus of treatment to
that aspect.
-
If the SUD is still above zero after doing one or
more of these techniques, and you are quite certain that PRs,
neurological disorganization, and other aspects of the
problem are not interfering, do another round of the sandwich.
Return to
SUD Possibilities
|
|
|
Gets Down to 2 or Less
-
Once this threshold has been reached, another
bridging technique or the
Eye Roll will often bring it all the way down.
-
If the SUD is still above zero after doing one or
more of these techniques, do another round of the "sandwich."
Return to
SUD Possibilities
|
|
|
|
The Eye Roll Technique: |
|
While steadily tapping the gamut spot
(the point between and just below the knuckles of the
little finger and the ring finger on the back of either hand):
Return to instructions
for when SUD gets down to 2.
|
|
|
|
The Elaborated Eye Roll
Technique: |
| |
-
Tap the gamut spot (the point on the back of
the left hand that is just below the knuckles and between the ring
finger and the little finger), or the
points at the outside edges of the eyebrows, while slowly and steadily
rolling your eyes upward from the floor to the ceiling.
-
Partially lower your eyelids while keeping the
eyeballs in the raised position and take a deep breath.
-
Stop tapping and exhale while lowering the eyeballs
to a horizontal position, allowing the eyes to completely close.
-
A relaxing, floating feeling is often experienced and
is encouraged by suggestions such as "Go with the flow."
-
The SUD level is then reevaluated.
Return to instructions
for when SUD gets down to 2.
|
|
|
| Reaches 0 The additional
steps presented in the "Closing Phases" module will:
- anchor in the new response
- project the positive state into the future
- fix the gains into the person’s life
After the SUD has reached 0 or near 0, you will
complete the treatment in the first practice session of the
Closing Phases module. If you are already
at or near 0, you may wish to jump directly to the
Closing Phases module now and return later to the next
module, "Advanced Meridian Treatments."
Return to "Subsequent
Rounds" Practice Session
|
|
|
|
|
PRACTICE SESSION 1: THE ALARM POINTS |
|
| |
|
Have your partner access
and lock in a new problem state
or the problem state used in the previous module if that problem has not
been resolved.
Using the
Meridian Assessment Chart, energy check each alarm point. When
testing while a problem state is locked in, a
strong indicator muscle means that the energy in the related
meridian is disturbed.
Make a note of which meridians need treatment while
the problem state is locked in. Switch roles.
Return to List
of Advanced Meridian Treatments Practice Sessions
|
|
|
|
|
PRACTICE SESSION 2: Stimulating Treatment Points |
|
|
If you are not working with the same partner, or if some time has
passed, repeat
Practice Session 1.
Then be sure the problem state is still locked in, or
lock it in again. Next, identify the meridians that you noted as needing
correction when you checked the alarm points in Practice Session I, and
click the meridian name on the
Alarm Point Chart (or on the
Table of Meridian Treatment Charts) to locate the treatment chart
for that meridian.
Treat each meridian using one of the points listed on
the chart and re-check the alarm point. If the indicator muscle is
weak (meaning that the treatment was
effective), go on to check the next meridian. If the indicator muscle
remains strong during the alarm
point check (meaning this meridian still
requires treatment), stimulate another point from the chart
for that meridian.
Return to List
of Advanced Meridian Treatments Practice Sessions
|
|
|
|
|
PRACTICE SESSION 3: VERBAL TREATMENTS |
|
|
Review the
Meridian Emotions and Affirmations list. Focusing on the same
problem used in the previous practice session, or a new problem,
experiment with the verbal treatments:
-
Using the
alarm points as before, find a meridian that needs treatment
when the problem state is locked in.
-
Formulate an affirmation or self-suggestion based
on the information provided on that meridian’s
Treatment Chart.
-
Have the "client" state this affirmation while
stimulating one of the treatment points.
-
Recheck the meridian using the alarm points.
Experiment with different meridians. Change roles.
Return to List
of Advanced Meridian Treatments Practice Sessions
|
|
|
|
|
PRACTICE SESSION 4: CHOICE POINTS |
|
|
With your partner, review and discuss each treatment choice point that
depends upon one of the periodic SUD ratings.
Return to List
of Advanced Meridian Treatments Practice Sessions
|
|
|
|
|
PRACTICE SESSION 5: A
COMPLETE SESSION |
|
|
With your partner, go through a complete session, from 1) the opening
phases, to 2) assessing the acupoints needing treatment, to 3) moving
through the various choice points based on the periodic SUD ratings for
getting the SUD rating down to 0, to 4) providing the client with a copy
of the
Meridian Treatment Checklist. You might also want to keep the
Opening Phases and the
Meridian Intervention
flow charts nearby.
When the SUD reaches 0 or near 0, you will complete
the treatment in the
"Closing Phases" module. Considerations if the SUD cannot be brought
down to 0 or near 0 are addressed later in this module.
With your partner, switch between the client and therapist roles.
Return to List
of Advanced Meridian Treatments Practice Sessions
|
|
|
|
|
PRACTICE SESSION 1: ANCHORING TECHNIQUES |
|
|
First, access a positive internal state and
do the Eye Roll, the Third Eye Tap, and the Auric Weave in sequence,
keeping the positive state active. Teach your partner the three
techniques.
Then, with your partner, review your work in
Practice Session 5 of the previous module (a complete treatment
sequence that brings the SUD of a target problem down to 0 or near 0).
Continue experimenting with the three anchoring techniques in
relationship to the problem that has now been neutralized. Switch with
your partner between the client and therapist roles.
Return to List of
Closing Phases Practice Sessions
|
|
|
|
|
PRACTICE SESSION 2: OUTCOME PROJECTION PROCEDURE |
|
|
Working now with the original problem, whose SUD level is now down to 0,
and having anchored in that SUD level in
Practice Session 1, with your partner, go through the steps of the
outcome projection procedure. Each be in both the client and the
therapist role.
Return to List of
Closing Phases Practice Sessions
|
|
|
|
|
PRACTICE SESSION 3: BACK-HOME ASSIGNMENTS |
|
With a positive outcome projected into the
future:
-
Discuss with your partner the possibility of
setbacks.
-
Formulate back-home assignments and clearly agree
about how they will be implemented.
-
Experiment with the
Temporal Tap.
-
Work out with your partner the ways you will be
available to one another to support each other’s ongoing progress.
This would also be a good point to read the paper
entitled,
Five Keys to Successful Energy Psychology Treatment, written for
Energy Psychology Interactive by psychologists David Grudermeyer and
Rebecca Grudermeyer. They are two of the founders of the Association for
Comprehensive Energy Psychology, and the paper is based on their
involvement with the leaders and innovators within energy psychology as
well as their years of clinical experience.
Return to List of
Closing Phases Practice Sessions
|
|
|
|
|
CORE BELIEF PRACTICE
SESSION |
|
|
With a partner, move through all the steps
from identifying to transforming a core belief that interferes with
personal goals.
Return to List of
Core Belief Practice Sessions
|
|
|
|
|
PRACTICE SESSION 1: USING A PROBLEM-SPECIFIC PROTOCOL |
|
|
With a partner, identify a problematic
emotional response in one of the seven areas covered so far in this
module (anger, fear, panic, worry, jealousy, guilt, shame). Go through
an entire treatment sequence as outlined below, using the corresponding
protocol as step 5:
-
After appropriate
preliminaries, access and "lock in" a problem state.
-
Rate the amount of distress it causes (SUD and
MUD ratings).
-
Address neurological disorganization.
-
Correct psychological reversals before and during
the treatment sequence.
-
Shift the energies related to the problem state
using appropriate energy treatments.
-
Introduce additional procedures to lower the SUD
level (e.g. 9 Gamut, Blow-Out/Zip-Up/Hook-In, Eye Roll), anchor it
in when it has reached zero, and bridge the gains into back home
situations.
Return to List of
Protocols and Shortcuts Practice Sessions
|
|
|
|
|
PRACTICE SESSION 2: ENHANCING PEAK PERFORMANCE |
|
|
You guessed it! With your partner, conduct a
session to enhance peak performance in an area that matters to you (from
tennis to applying the techniques of energy psychology). Exchange
feedback. Reverse roles.
Return to List of
Protocols and Shortcuts Practice Sessions
|
|
|
|
|
PRACTICE SESSION: BALANCING THE CHAKRAS |
|
|
If one of the earlier practice treatment
sessions did not lead to a full resolution of the presenting problem,
return to the treatment, this time incorporating chakra balancing.
Alternatively, choose a new problem area and conduct
a session using the protocols you have learned in this program, this
time, however, working with the chakras rather than the meridians.
At the end of the session, solicit feedback from your
partner and then reverse roles.
Return to List of
Working with the Chakras Practice Sessions
|
|
|
|
|
PRACTICE SESSION 1: FOUR FAMILIAR RADIANT ENERGY
TECHNIQUES |
|
Play with each of these techniques and see
which feels the best:
- Crown Pull
- Blow-Out/Zip-Up/Hook-In
- Triple Warmer/Spleen Hug.
- Dancing to the Eights
Teach them to another.
Return to List
of Radiant Energy Systems Practice Sessions
|
|
|
|
|
PRACTICE SESSION 2: SIX NEW RADIANT ENERGY TECHNIQUES |
|
Play with each of these techniques and see
which feels the best:
- Stretch and Bounce
- Butt in the Air
- Ab Stretch
- Toweling Off
- Radiant Imagination
- Heaven Rushing In
Teach them to another.
Return to List
of Radiant Energy Systems Practice Sessions
|
|
|
|
|
PRACTICE SESSION 3: BALANCING THE RADIANT CIRCUITS |
|
|
If one of the earlier practice treatment
sessions did not lead to a full resolution of the presenting problem,
return to the treatment, this time working with the radiant circuits.
Alternatively, choose a new problem area and conduct
a session using the protocols you have learned in this program, this
time, however, working with the radiant circuits rather than the
meridians or chakras.
At the end of the session, solicit feedback from your
partner and then reverse roles.
Return
to List of Radiant Energy Systems Practice Sessions
|
|
|
| |
| |
|
|