|
|
NEUROLOGICAL DISORGANIZATION
CORRECTION TECHNIQUES |
|
|
|
|
|
(Excerpted from the
Neurological Disorganization Module)
|
| |
|
This overview presents two generic routines for
neurological disorganization, and it then lists specific types of
neurological disorganization, and the checks and corrections for them.
|
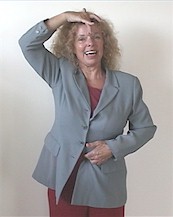
The 3 Thumps/
3 Navel Touch |
|
|
|
This simple 90-second sequence will in many instances improve the
energetic balance of the nervous system and increase the effectiveness
of subsequent energy interventions.
|
The Three Thumps |
|
|
|
|
Certain points on your body, when tapped with your
fingers, will affect your nervous system in predictable ways, sending
electrochemical impulses to targeted regions of your brain and releasing
neurotransmitters. |
| |
|
|
By tapping three specific
sets of points, a sequence called the 3 Thumps, you can activate a series of internal
responses that will help restore you when you are tired, increase your vitality, and keep
your immune system stronger amidst stress. You can tap these points any time you need a
boost.
Do not be too concerned about finding the precise location of each
point. If you use several fingers to tap in the vicinity shown on the chart, you will hit
the right spots. Tap hard enough that you hear the tap, but never so hard as to risk
bruising yourself.
Drawing by Brooks Garten reproduced,
with
permission, from Donna Eden’s Energy Medicine. |
|
|
|
|
 |
 |
|
|
K-27 Points |
15-20 seconds |
|
|
Thymus Gland |
15-20 seconds |
|
|
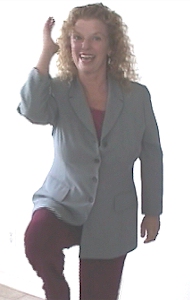
Spleen Points |
15-20 seconds |
|
|
|
| K-27 |
Thymus |
|

|
|
| |
| Spleen
Points |
|
 |
|
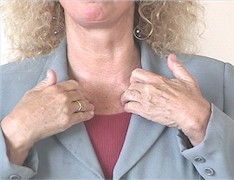
This photo shows
stimulation of the spleen acupuncture points. The figure
above shows the stimulation of the spleen neurolymphatic
points. Either can be used. The ones that are most
tender will have the greatest impact. |
|
|
|
The 3 Navel Touch |
|
|
|
Following the 3 Thumps, breathe deeply as you
perform the:
|
|
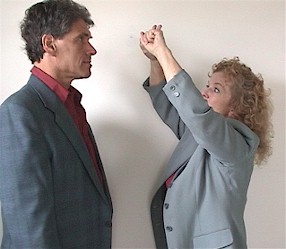
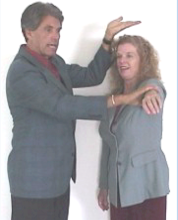
1. Navel/Skull-Base
Hold |
|
 |
Find
the soft area where the back of your neck merges with the base of your skull. |
|
|
|
|
|
Place
your thumb and forefinger into this area with a bit of pressure. |
|
|
|
|
|
Place
the middle finger of your other hand into your navel, push in, and pull up. |
|
|
|
|
|
Hold for
about 12 seconds. |
|
Navel/Skull-Base
Hold |
|
|
|
|
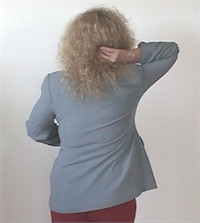
| |
| Navel/Tailbone
Massage |
 |
|
|
2. Navel/Tailbone
Massage |
|
|
|
Simultaneously
hold the tailbone and massage the navel for about 12 seconds. |
|
|
|
| |
| |
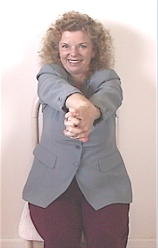
3. Navel/Third-Eye
Hook-Up |
| |
|
|
Place
the middle finger of one hand on the third eye (between the eyebrows above the bridge of
the nose).
|
|
|
Place
the middle finger of the other hand in the navel.
|
|
|
Gently
press each finger into the skin, pull it upwards, and hold for about 12 seconds.
|
|
|
| Navel/Third-Eye
Hook-Up |
 |
|
|
| |
|
This brief sequence is worth memorizing and using
whenever you are not functioning at your best, physically or mentally.
It will jump-start your own energy system. And it can help prepare your
clients, energetically and neurologically, for subsequent energy
interventions. |
|
|
|
THE 3-PART/3 MINUTE
ROUTINE
A Deeper Generic Balancing for the Energies of
the Nervous System |
|
| |
| |
1. Crown Pull |
|
| |
2. Connecting Heaven and Earth |
|
| |
3. Wayne
Cook Posture |
|
|
| |
|
This sequence has been reported to correct
neurological disorganization enough for treatment to proceed in upwards
of 80% of cases. |
Neurological
Disorganization |
|
|
|
Triggers, Checks, and Corrections
(To Review Any of These
Topics, Simply Click Its Name) |
|
|
|
|
|
Meridians
Running Backward:
The energies along each
meridian normally flow in a specific direction.
At times of exhaustion,
upset, or confusion, the meridian system may literally reverse its
flow and run backward.
This causes activities that
typically vitalize the meridian system, such as walking or running
(which are in alignment with the normal flow of the energies), to
further drain it.
Reversing its energies is the
body’s way of saying, "Slow down, take a rest," and enforcing the
suggestion by placing a high energy tax on normal activities.
|
|
|
To Check Whether the Meridians are Running Backward:
(the Reverse Walk Check)

|
|
| |
To determine if the meridians
are running backward, first use an energy check to find a firm
indicator muscle.
You can strengthen indicator
muscles that do not stay firm by selecting techniques from the
90-second and 3-minute sequences you have already learned (such as the
3 Thumps). Establishing a firm indicator muscle is the first step in
any procedure that utilizes energy checking.
Once a firm indicator muscle
has been identified, have the client take several steps forward. If
the indicator muscle loses strength, the meridian energy is probably
moving in a reversed direction.
Then have the client take
several steps backward. If the same indicator muscle regains its
strength, this confirms that the meridian energy is running backward.
|
|
|
|
CORRECTION SEQUENCE FOR
REVERSED ENERGIES:
(meridians are "running backwards")
|
|
| |
| |
1. Tap or Massage K-27
|
|
| |
2. Cross Crawl
|
|
|
|
|
STIMULATING K-27:
First have the client tap or massage the K-27 points
that you worked with earlier as part of the Three Thumps. These, the
27th points on the kidney meridian, are critical juncture points for the
entire meridian system. Stimulating them can be thought of as flipping a
switch that overrides the body’s defensive mechanism of reversing its
vital energies when tired or stressed.
Work with the K-27 points while breathing in deeply
through the nose and out through the mouth. Continue for about 20
seconds, stimulating both sides simultaneously. Some people find
it more effective to cross their hands, tapping or massaging the left
side with the right hand and right side with the left.
To Find K-27: To find the
exact location of these points, press your index fingers in at the
bottom of your neck, beneath your Adam’s apple and you will notice
that you are at the top of bones (your sternum) that form a U-shaped
notch (about where a man would knot his tie). From the top of the U,
move your fingers down toward your navel, about an inch and then go to
the left about an inch and the right about an inch. Most people have
slight indents there.
|
The Cross Crawl |
|
|
| |
 |
To stabilize the forward direction of the
meridian flow after stimulating the K-27 points, have the
client walk in place with the right arm and the
left leg raising simultaneously, and then the left
arm and right leg, for 30 to 90 seconds.
Check again for reversed energies. If
still present, proceed to the homolateral crossover.
From Donna Eden’s Energy Medicine |
|
|
The
Homolateral Crossover |
|
|
| |
-
Have the client begin by again tapping
or massaging the K-27 points, followed by a full body
"reaching for the stars" stretch.
-
The client then marches in place,
lifting right arm with right leg and then left arm with
left leg.
-
The client is reminded to breathe
deeply throughout the entire routine.
-
After about 12 lifts of the arms and
legs in this homolateral pattern, stop and change the
pattern to a normal cross crawl (lifting opposite arms and
legs) for about 12 lifts.
|
|
|
-
Repeat the pattern twice.
-
Anchor it with an additional dozen
cross crawls and stimulation of the K-27 points.
|
|
|
|
|
Triple Warmer in Overwhelm:
Triple warmer is the energy system that governs 1) the fight or flight response, 2) the immune system, and 3) the
maintenance of survival-oriented habits.
When a person faces threat or substantial stress, a
series of psychological, biological, and chemical events—the
fight-or-flight response—is initiated by triple warmer. This emergency
response often can dominate all other activities and often results in
impaired judgment, emotional volatility, and finally exhaustion.
When the physical or emotional stress is persistent,
triple warmer becomes perpetually activated ("goes into overwhelm"),
exacting long-term physical and emotional costs.
|
|
|
|
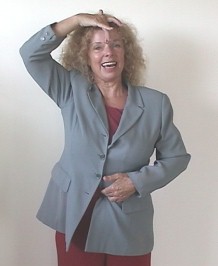
TO CHECK WHETHER TRIPLE WARMER IS IN OVERWHELM:
(the Palm-around-Ear Check)
|
|
| |
|
|
-
Have the client cup either hand, spread the
fingers, and place the palm of the hand around either ear with
the fingers touching the head a couple of inches from the ear.
-
Energy check.
-
If the muscle loses firmness, triple warmer
overwhelm is indicated.
|
|
|
|
|
When triple warmer is in
overwhelm, "Smoothing behind the Ears," the "Wayne Cook
Posture," and the "Triple Warmer/Spleen Hug" are powerful corrections.
|
Smoothing Behind the
Ears |
|
|
| |
-
Rest your face in your hands, palms at
your chin, fingers at your temples. Hold this for two
breaths.
-
Breathe in deeply and push your fingers
upward two or three inches with some pressure, smoothing
the skin from the temples to above the ears.
-
On the exhalation, circle your fingers
around your ears, press down the sides of your neck, and
hang both hands on the backs of your shoulders, pressing
your fingers into your shoulders.
|
|

|
|
-
Stay in this position for at least two deep
breaths. Then drag your fingers slowly over your shoulders with
pressure. Once your fingers reach your clavicle, let go.
|
The Wayne Cook
Posture |
|
|
|
| |
|
|
-
While sitting, place your right foot
over your left knee, wrap your left hand around your right
ankle, and your right hand around the ball of your right
foot (best done with shoes removed).
-
Breathe in slowly through your nose,
letting the breath lift your body while breathing in. At
the same time, pull your leg inward, creating a stretch.
Exhale slowly out your mouth, allowing your body to relax.
Repeat this slow breathing and stretching four or five
times.
-
Switch to the other foot. Place your
left foot over your right knee, wrap your right hand
around your left ankle, and your left hand around the ball
of the your foot. Use the same breathing.
|
|
|
-
Uncross your legs, place your
fingertips together forming a pyramid, bring your thumbs
to rest on your third eye, just above the bridge of your
nose, and breathe slowly in through your nose and out
through your mouth, about five times.
|
|
From Energy Medicine.
Drawings by Brooks Garten.
|
|
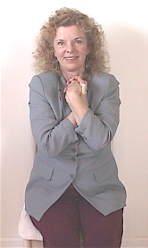
Alternative to the
Wayne Cook Posture |
|
|
|
| |
|
A simpler procedure with similar effects (although
for some people it does not hold as long or impact the nervous system as
strongly) is to: |
| |
- While sitting, cross your ankles, left over right.
- Place your hands in front of you, arms extended, with the backs of
your hands touching.
|
-
Bring your right hand over your left
hand and bring your palms together.
-
Clasp your fingers.
-
Fold your hands and arms inward and
rest them on your chest underneath the chin.
-
Breathe deeply in this position for up
to a minute.
|
|
 |
 |
|
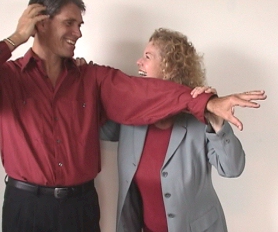
Triple Warmer Spleen
Hug |
|
|
| |
|
Balancing the polar energies of the triple warmer and
spleen helps bring a balance to two of the trickiest systems in the
body. It can provide comfort and reduce emotional overwhelm. Have the
client: |
| |
-
Wrap the left hand around the right arm
with the middle finger at the indent just above the elbow.
-
Wrap the right hand around the left
side of the body, with the fingers underneath the
underarm, and the hand resting on the chest.
-
Be still or gently rock. Stay in this
position for at least three deep breaths, or up to two
minutes.
-
Repeat on other side.
|
|

|
|
|
POLARITY
REVERSAL:
Electrical currents move
throughout the body and, as occurs wherever electricity flows, a
magnetic charge is built. Like a compass, every magnetic charge has a
north and a south polarity.
The body becomes accustomed
to its own magnetic charge and to the magnetic charges in the
environment.
When the poles of the body’s
magnetic charge become reversed, called a polarity reversal,
neurological disorganization often follows.
|
| |
|
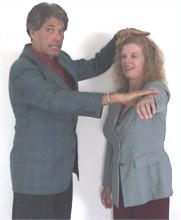
TO CHECK FOR A POLARITY REVERSAL:
(Hand-over-Head Check)
|
|
| |
|
The palm side of the hand has an opposite charge from
the back of the hand, and this is used in checking for a polarity
reversal. The client places the palm of the right hand an inch above the
apex of the head. Energy check. The client turns the palm up. Energy
check. Each of the three possible combinations has a different meaning. |
| |
|
If palm down checks
strong and palm up checks weak, the polarities are as they
should be.
If palm down checks
weak and palm up checks strong, it may indicate a polarity
reversal or a psychological reversal (see next module).
If there is no
differential between the two palm positions, a polarity
reversal is a strong possibility. |
|
|
 |
|
|
|
|
A CORRECTION SEQUENCE FOR POLARITY REVERSALS: |
|
| |
|
If you suspect a polarity reversal, the correction
sequence will do no harm even if the condition is not present, and it
is, in fact, still likely to have a positive effect. The correction is
simply a combination of two techniques you have already learned:
| |
1. Crown Pull |
|
| |
2. Navel/Third-Eye Hook-Up |
|
|
The Crown Pull |
|
|
| |
|
As you learned in the 3-Part/3-Minute Routine, while
doing the crown pull, breathe deeply, in through your nose and out
through your mouth: |
| |
-
Place your thumbs at
the side of your head on your temples. Curl your fingers and
rest your fingertips just above the center of your eyebrows.
-
Slowly, and with some
pressure, pull your fingers apart so the skin just above your
eyebrows is stretched.
|
|
From Donna Eden’s Energy Medicine
Drawing by Brooks Garten |
-
Rest your
fingertips at the center of your forehead and repeat the
stretch.
-
Rest your
fingertips at your hairline and repeat the stretch.
-
Continue this
pattern, moving back over your head, down to your neck,
and finally resting on your shoulders and dragging your
fingers over your shoulders.
|
|
|
Navel / Third-Eye Hook-up |
|
|
| |
-
Place the middle finger of one hand on
the third eye (between the eyebrows above the bridge of
the nose).
-
Place the middle finger of the other
hand in the navel.
-
Gently press each finger into the skin,
pull it upwards, and hold for about 12 seconds.
|
|
|
|
|
|
| OCULAR LOCK: |
|
Disturbed coordination of the eyes is called "ocular lock" and can reflect neurological disorganization. The
underlying cause is often a cranial fault and might require the services
of a cranial-sacral or other specialist. However, the treatment sequence
that follows will often correct the condition enough so that the energy
psychology treatment can proceed.
|
|
|
CHECKING FOR OCULAR LOCK:
(the Left/Right Eye Rotation)
|
|
|
Client rotates eyes 360˚ to
the right and 360˚ to the left.
Saccadic (jerky) eye
movements when eyes pass through a particular position indicate the
presence of ocular lock and related neurological disorganization.
Ocular lock is also indicated
if a firm indicator muscle checks weak immediately following the eye
rotation.
|
| |
|
TO RECEIVE AT LEAST SOME RELIEF FROM OCULAR LOCK:
|
|
|
| |
Massage and Palm the Orbs |
|
| |
Navel/K-27 Massage |
|
|
|
|
|
MASSAGING AND PALMING THE ORBS:
-
Have the client press each thumb into the bone
that surrounds the eyes, and continue around the orbit above and
below each eye.
-
Rub hands together to generate heat and energy
and place the palms of each hand over the eyes.
-
Breathe deeply, holding for 30 seconds or longer.
|
|
|
|
THE NAVEL/K-27 MASSAGE:
-
Find the K-27 Points: Place thumb and forefinger
on the U-shaped notch at the top of the breastbone (about where a
man would knot his tie). From the bottom of the U, move the
forefinger down toward the navel one inch and then go to the left
(or right) one inch. Most people have a slight indent here.
-
Stimulate by vigorously massaging these points
with one hand while placing the middle finger of other hand into the
navel and gently massaging the navel.
|
|
|
|
|
HOMOLATERAL
PATTERNING |
|
| |
|
The body’s energies are meant to cross over from one
side to the other. This pattern is found in microcosm with the double
helix of DNA, and it extends to the way the left side of the brain
controls the right side of the body and the right side of the brain the
left side of the body. When the body’s energies are not crossing over
from one side to the other, neurological disorganization results, as
well as compromised immune functioning. The condition is known as homolateral patterning.
|
|
|
|
A CHECK FOR HOMOLATERAL PATTERNING:
(THE X & Parallel Line Test)
|
|
| |
Energy check as
the client looks at an X drawn on a sheet of paper or made
with the practitioners hands.
Then energy check
as the client looks at two parallel lines.
|
If the X checks strong and the parallel
lines check weak, the energies between the left and right
sides of the brain are crossing properly.
Otherwise, the energies are running in a
homolateral pattern. |
|
|
|
|
The Homolateral Crossover |
| A correction for
Homolateral Patterning is the Homolateral Crossover.
|
|
|
|
| |
-
Have the client begin by again tapping
or massaging the K-27 points, followed by a full body
"reaching for the stars" stretch.
-
The client then marches in place,
lifting right arm with right leg and then left arm with
left leg.
-
The client is reminded to breathe
deeply throughout the entire routine.
-
After about 12 lifts of the arms and
legs in this homolateral pattern, stop and change the
pattern to a normal cross crawl (lifting opposite arms and
legs) for about 12 lifts.
|
|
|
|
-
Repeat the pattern twice.
-
Anchor it with an additional dozen
cross crawls and stimulation of the K-27 points.
|
|
| |
|
|
STABILIZING THE CORRECTIONS |
|
| |
|
If you review the above chart of neurological
disorganization, you will see that you have learned to recognize, energy
check for, and treat five basic forms of neurological disorganization.
At the bottom of the chart are five additional
correction sequences that are not associated with a specific type of
neurological disorganization. These have generic benefits (as, it should
be noted, do many of the specific techniques). Two are used for
stabilizing the gains after other corrections for neurological
disorganization have been successfully applied. The other three can be
done in the treatment setting, but they are also recommended as
back-home assignments when neurological disorganization is persistent.
After successfully correcting for neurological
disorganization, "Dancing to the Eights" and "Polarity Unswitching"
(following) are
brief procedures that serve to stabilize the correction.
|
Dancing to the Eights |
|
|
| |
|
From Energy Medicine
Drawing by Brooks Garten
|
|
Like the double helix of DNA, the
figure eight is one of nature’s most basic patterns. Weaving
your energies in figure-eight curves supports the corrections,
connects the hemispheres of your brain, activates numerous
energy systems (notably the
radiant energies), and brings the body into greater
health and vitality.
Put on music if you wish and move your
hips to a figure eight, then your arms. Flow freely, moving your
entire body while creating as many small and large figure
eights as occur to you. Allow the dance to evolve into any
pattern that feels good. |
|
|
|
|
|
POLARITY UNSWITCHING
|
|
| |
|
Polarity Unswitching, a
correction technique for
neurological disorganization, is not to be confused with a "polarity
reversal," which is a form of neurological disorganization. And it is
not to be confused with "switching," which is another term sometimes
used for "neurological disorganization." Polarity Unswitching involves
four steps:
-
Do the Crown Pull.
Click here to review the
crown pull.
-
Place thumb and first two fingers of one hand
over the third eye and the thumb and first two fingers of the other
hand at the notch where the neck meets the back of the head. Hold
for at least 3 deep breaths.
-
Briskly tap or rub the K-27 points (the areas
under each side of the collarbone, next to the sternum).
-
Massage the Wellspring of Life points at the
bottom of each foot, below the ball of the foot and between the
first and second toes (the K-1 points). Massage deeply for several
seconds.
|
|
|
HOMEWORK:
Additional corrections, or back-home routines, for establishing and
maintaining positive neurological and electromagnetic patterns: |
| |
|
|
Neurolymphatic Massage |
|
|
| |
|
Massaging the neurolymphatic points dislodges
accumulations of toxins so they can be eliminated from the body. This
creates physical space and better conditions for the body’s energies to
flow more naturally and freely. The most frequently used neurolymphatic
point in energy psychology is called the chest
sore spot, which is near the left shoulder, but any spot that
is sore may indicate a blockage of lymph that can be freed by working
with the neurolymphatic point at that spot.
Find any sore spots on the chest and firmly massage
each for a few seconds while breathing deeply. The soreness typically
indicates lymphatic congestion. When you rub the area, you are
dispersing that congestion. The more frequently you massage a point, the
congestion becomes dispersed and the soreness diminishes. Working on a
daily basis with the spots that tend to be chronically sore is an
excellent practice.
Massaging the sore area should not cause more than a
little discomfort. If it does, lighten your pressure a bit. Also, if the
client has had an operation in that area of the chest or if there is any
medical reason not to be probing in a specific area, use appropriate
caution.
|
| |
| |
|